---
title: Why Is My Signal Voltage Doubled? Understanding Red Pitaya Input Impedance & 50 ΩTermination
description: Why is your signal voltage twice as expected? Learn how to manage input impedance, 50 Ω termination, and source loading on your Red Pitaya.
image: https://content.redpitaya.com/hubfs/Input%20impedance%201920%C3%971000@1x.png
---
[](https://redpitaya.com/)
[](https://redpitaya.com/)
- Products
- [STEMlab 125-14 Gen 2](https://redpitaya.com/stemlab-125-14-gen2/)
- [STEMlab 125-14](https://redpitaya.com/stemlab-125-14/)
- [SIGNALlab 250-12](https://redpitaya.com/signallab-250-12/)
- [SDRlab 122-16](https://redpitaya.com/sdrlab-122-16/)
- [STEMlab TI (Texas Instruments)](https://redpitaya.com/stemlab-ti-texas-instruments/)
- [Multi-channel Solutions](https://redpitaya.com/multi-channel-solutions/)
- [Accessories](https://redpitaya.com/accessories/)
- [Applications](https://redpitaya.com/applications/)
- Documentation
- [Technical Documentation](https://redpitaya.com/documentation/)
- [Teaching materials](https://redpitaya.com/teaching-materials/)
- [Student projects](https://redpitaya.com/student-projects/)
- [User forum](https://forum.redpitaya.com/)
- [About](https://redpitaya.com/about-us/)
- [History](https://redpitaya.com/history/)
- [Distributors](https://redpitaya.com/distibutors-red-pitaya/)
- [Blog](https://content.redpitaya.com/blog)
[Shop](https://redpitaya.com/shop/)
- [ACADEMIA](https://redpitaya.com/academia/)
- [RADIO AMATEURS](https://redpitaya.com/radio-amateurs/)
- [Home](https://redpitaya.com/)
- Products
- [STEMlab 125-10](https://redpitaya.com/stemlab-125-10/)
- [STEMlab 125-14](https://redpitaya.com/stemlab-125-14/)
- [SIGNALlab 250-12](https://redpitaya.com/signallab-250-12/)
- [SDRlab 122-16](https://redpitaya.com/sdrlab-122-16/)
- [Accessories](https://redpitaya.com/accessories/)
- [Applications](https://redpitaya.com/applications/)
- [Resources](https://redpitaya.com/documentation/)
- [Shop](https://redpitaya.com/shop/)
- [About](https://redpitaya.com/about-us/)
- [Blog](https://content.redpitaya.com/blog)
- [Compare](https://redpitaya.com/compare/)
- [Login / Register](https://redpitaya.com/my-account/)
### Red Pitaya Blog
[Home](https://redpitaya.com) » [Blog](https://content.redpitaya.com/blog/tag/blog) »
[Blog](https://content.redpitaya.com/blog/tag/blog)
# Why Is My Signal Voltage Doubled? Understanding Red Pitaya Input Impedance & 50 ΩTermination
- Posted by  [Red Pitaya Technical Editorial Team](https://redpitaya.com/Red-Pitaya-Blog-team/) , October 12, 2026
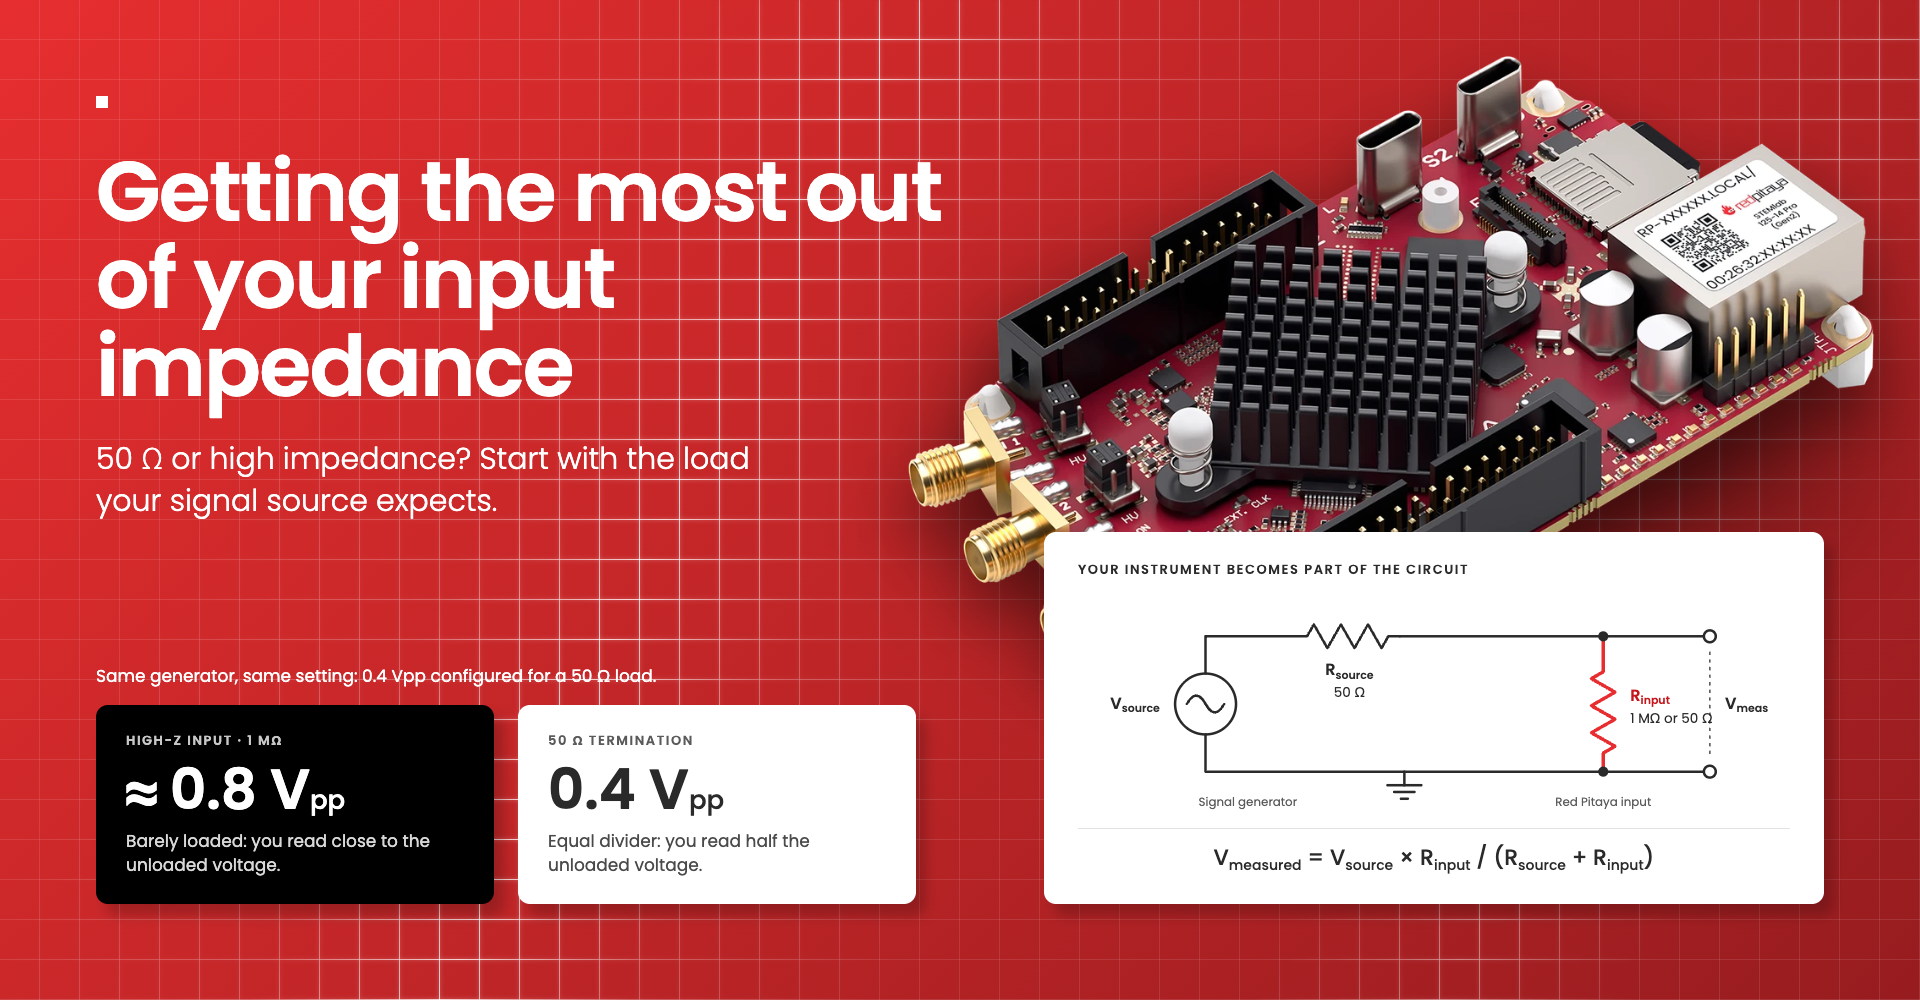
50 Ω or high impedance? Start with the load your signal source expects.
You connect a signal generator to your Red Pitaya, set the amplitude and start measuring. The waveform looks right, but the voltage is twice what you expected. Before changing your code or recalibrating the board, check the relationship between the generator’s output impedance and the load it expects.
A generator configured to display its amplitude into 50 Ω can produce approximately twice that voltage when connected to a high-impedance input. Understanding why starts with a simple question: what load should your signal source see?
## Your instrument becomes part of the circuit
A measurement input does not observe a signal without affecting it. Connecting the instrument adds a load, and that load interacts with the source’s output impedance. For a simple, low-frequency model with purely resistive source and input impedances, the voltage follows a familiar divider:
Vmeasured = Vsource × Rinput / (Rsource + Rinput)
Here, Vsource is the source’s unloaded voltage, not necessarily the amplitude displayed on the generator. When the input resistance is much larger than the source resistance, the measured voltage is close to the unloaded voltage. When both resistances are equal, the measured voltage is half the unloaded voltage.
Neither result means the instrument is wrong. They describe different loading conditions, so the same source can produce different measured amplitudes without any change to its settings.
## Know your Red Pitaya input
The original STEMlab 125-14 fast analog inputs are specified as 1 MΩ in parallel with approximately 10 pF. This is a high-impedance input, not an internally terminated 50 Ω input. Other Red Pitaya models differ: the SDRlab 122-16, for example, has 50 Ω RF inputs. Always check your particular board.
On the original STEMlab 125-14, the LV and HV jumpers select the input voltage range: ±1 V or ±20 V. They do not switch the input between 1 MΩ and 50 Ω. Input range and input termination are separate choices.
## Why a signal can appear twice as large
Consider a bench generator with a fixed 50 Ω output resistance. Its display is configured for a 50 Ω load, and you set the signal to 0.4 V peak-to-peak. To deliver that voltage across an equal 50 Ω load, the generator needs an unloaded signal of approximately 0.8 V peak-to-peak.
Connect that output to a high-impedance input instead, and the voltage divider barely attenuates the signal. You therefore measure approximately 0.8 V peak-to-peak. The apparent doubling is a consequence of the load, not extra gain inside the Red Pitaya.
## Match the generator setting to the connection
On generators with a fixed output impedance, selecting “High-Z” changes the assumed load used for amplitude settings and readouts. It does not physically remove the output resistance. Select the appropriate load setting, then set the desired amplitude and verify the actual voltage at the input.
Also check that you are comparing the same units. Peak, peak-to-peak and RMS are different quantities. A correct impedance setup can still look wrong when the source and measurement application describe amplitude differently.
## When high impedance makes sense
High input resistance is useful when you need to measure voltage without significantly loading a circuit. Using the voltage-divider model, a source with 10 kΩ output resistance retains approximately 99% of its unloaded voltage when measured by a 1 MΩ input. Connecting a 50 Ω load instead leaves only about 0.5%.
That is why adding a terminator is not a universal improvement. A sensor or other high-resistance source may be unable to drive 50 Ω, causing its signal to fall dramatically. The right connection depends on the source, not just the connector type.
The input capacitance matters too. Using a nominal 10 pF value, its capacitive reactance at 10 MHz is approximately 1.6 kΩ. This simplified calculation shows why “1 MΩ input” does not mean 1 MΩ at every frequency. Cable and probe capacitance can add further loading, especially when measuring a high-impedance circuit node.
## When to use 50 Ω termination
Use 50 Ω termination when the source and interconnection are intended to operate as a 50 Ω system. Besides establishing the expected load voltage, appropriate termination helps reduce transmission-line reflections that can produce ringing or distort waveform edges. Fast edge speed matters here, not only the signal’s repetition frequency.
For a high-impedance STEMlab input, connect an appropriate external 50 Ω termination in parallel with the input, close to the connector. A suitable feed-through terminator or tee-and-terminator arrangement can provide this load. A resistor inserted in series with the signal is not the same thing.
Before connecting it, check the source’s drive capability, the terminator’s power rating and the board’s permitted input range. Include any DC offset when assessing voltage and power. A terminator is a load, not an overvoltage protection device.
## The takeaway
Before troubleshooting an unexpected amplitude, check the source impedance, the generator’s configured load, the actual termination and the selected input range. Those checks can explain an apparent measurement error before any calibration is needed.
**High impedance reduces loading. A 50 Ω termination matches a 50 Ω signal path. Neither is the right choice for every measurement.**
---
## Frequently Asked Questions (FAQ)
### **1. Why does my signal voltage look twice as large on my Red Pitaya compared to the generator setting?**
If your bench generator assumes a 50 Ω load, it doubles its internal output voltage to overcome its own 50 Ω source resistance. When connected to a high-impedance input (like the 1 MΩ input on the STEMlab 125-14), the voltage divider barely attenuates the signal, so you measure the full unloaded voltage.
### **2. Do the LV/HV jumpers on the STEMlab 125-14 switch the input impedance between 1 MΩ and 50 Ω?**
No. The LV and HV jumpers only select the input voltage range (±1 V or ± 20 V). Input range and input impedance are completely separate configurations.
### **3. How and when should I use a 50 Ω terminator with a high-impedance Red Pitaya input?**
Connect an external 50 **Ω** feed-through terminator in parallel with the input (close to the connector) when your source and cables are designed for a 50 Ω system. Always verify that your signal source can handle driving a 50 Ω load before connecting it.
### About the Red Pitaya Team
The Red Pitaya Technical Editorial Team is a cross-functional group of technical communicators and product specialists. By synthesizing insights from our hardware developers and global research partners, we provide verified, high-value content that bridges the gap between open-source innovation and industrial-grade precision.
Our mission is to make advanced instrumentation accessible to engineers, researchers, and educators worldwide.
##### Categories
- [academia (47)](https://content.redpitaya.com/blog/tag/academia)
##### Recent Posts
- [](https://content.redpitaya.com/blog/red-pitaya-copilot-instrument-development)
[Red Pitaya Copilot: How to Build Custom FPGA Instruments with AI Assistance](https://content.redpitaya.com/blog/red-pitaya-copilot-instrument-development)
October 12, 2026
- [](https://content.redpitaya.com/blog/choosing-fpga-boards-industrial-rd)
[Choosing FPGA Boards for Industrial R&D: Moving Beyond Generic Dev Kits](https://content.redpitaya.com/blog/choosing-fpga-boards-industrial-rd)
October 6, 2026
- [](https://content.redpitaya.com/blog/non-invasive-gerd-detection-radiofrequency-spectrophotometry)
[Non-Invasive GERD Detection: Continuous Esophageal Monitoring via Radiofrequency Spectrophotometry](https://content.redpitaya.com/blog/non-invasive-gerd-detection-radiofrequency-spectrophotometry)
September 29, 2026
##### Subscribe to our newsletter

An open-source solution for hobbyists, professors,
radio amateurs and industrial clients.
**Red Pitaya**
Velika pot 21,
5250 Solkan
Slovenia, Europe
Phone: +386 30 322 719
Email: [info@redpitaya.com](mailto:info@redpitaya.com)
**Red Pitaya US**
TX, Dallas - Downtown Republic Center
325 N. St. Paul Street
Suite 3100
Dallas, Texas, 75202
United States of America
IMPORTANT: This address does not accept RMAs
Phone: (888) 637-2706
Email: [US.office@redpitaya.com](mailto:US.office@redpitaya.com)
- Customer Service
- [Customer Support](https://redpitaya.com/customer-support/)
- [Shipping & Returns](https://redpitaya.com/shipping-returns/)
- [Contact us](https://redpitaya.com/contact-us/)
- [Cookie Policy](https://redpitaya.com/cookie-policy/)
- SLO
- [O nas](https://redpitaya.com/o-nas/)
- [Pogoji poslovanja](https://redpitaya.com/pogoji-poslovanja/)
- [Politika zasebnosti](https://redpitaya.com/politika-zasebnosti/)
- [Politika piškotkov](https://redpitaya.com/politika-piskotkov/)
##### Follow Us
#### Subscribe to our newsletter
Get notified about new SW features & updates, news about latest community projects & events and new Red Pitaya products & discounts
[Subscribe](https://go.redpitaya.com/cs/c/?cta_guid=36ccbdc0-0344-49c4-aa91-aa67cf437c09&signature=AAH58kHkxFYTAKU-ILQzHI1jlrdI_co0RA&placement_guid=a24cb732-1dfb-4d0a-8c52-aa6851ce9102&click=556cfaee-eee4-48e4-95e7-c483a4f78883&hsutk=537e15e740555d2fd6a1c1ad931d2b6f&canon=https%3A%2F%2Fredpitaya.com%2Fabout-us%2F&utm_referrer=https%3A%2F%2Fredpitaya.com%2Fcompare%2F&portal_id=7715357&redirect_url=APefjpGj5Dm9poAAzHFGh4S6pJ-2TvNzBdwZZlfbr7toxfw-epFUtzEHOKToHx0i2TYYr39srj9aSERdntJBh8lJqoSXL-pUF2gwhYvOW6IMm28hQVmhYML2AIbbIRrr3YaoyJkZQ0iRxq-uHlFt66i3_8XpQpXT_M2zF9fS7t0f6hlBjGBJ7X_aXDrhBwXcEAqwoWWleG4uxonSGOR-BBp3tpKcySXYELTGHeGn5Yo61r3xrFvqFP5P6BxVwxTi51_ceW9uBzOMvA1rYz4BsIhLSF8n4bhcHqJTvhibH_laJrjDNdEUUrU&__hstc=72355340.537e15e740555d2fd6a1c1ad931d2b6f.1635738083317.1635738083317.1635746314170.2&__hssc=72355340.5.1635746314170&__hsfp=530052575&contentType=standard-page)
**Red Pitaya** 2025 All Rights Reserved.
- [Privacy Policy](https://redpitaya.com/privacy-policy/)
- [Terms of Use](https://redpitaya.com/terms-of-use/)
```json
{
"@context" : "https://schema.org",
"@type" : "BlogPosting",
"author" : {
"@type" : "Person",
"name" : "Red Pitaya Technical Editorial Team",
"url" : "https://content.redpitaya.com/blog/author/red-pitaya-technical-editorial-team"
},
"dateModified" : "2026-10-12T13:57:57.316Z",
"datePublished" : "2026-10-12T13:57:57.000Z",
"headline" : "Why Is My Signal Voltage Doubled? Understanding Red Pitaya Input Impedance & 50 ΩTermination",
"image" : [ "https://content.redpitaya.com/hubfs/Input%20impedance%201920%C3%971000@1x.png" ],
"mainEntityOfPage" : {
"@id" : "https://content.redpitaya.com/blog/red-pitaya-input-impedance-50-ohm-high-z",
"@type" : "WebPage"
},
"publisher" : {
"@type" : "Organization",
"logo" : {
"@type" : "ImageObject",
"url" : "https://content.redpitaya.com/hubfs/Red-pitaya-logo.jpg"
},
"name" : "Red Pitaya d.o.o."
}
}
```